APPENDIX B
The Audit Module
The Main Audit Module Screen
When the Audit is created using the Audit Module, the information previously entered into the Management Professional case screen comes forward. Additional information may be entered into the Audit screen by the auditor.
Creating An Audit
In your MiniPro program, open a case (or ticket) and go to the Attachment Tab.
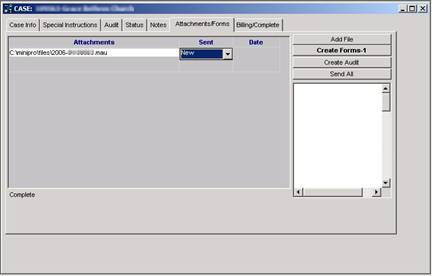
Click on the Create Audit button on the right side of the tab.
An audit file will appear under the Attachments list.
Double-click on the attachment name and the Audit Module screen will appear.
Audit Menus
There are several menu headings at the top of the Audit screen.
Save Click here to Save the audit information.
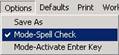
Options Click here to view the options available. (For more information on the Mode-Activate Enter Key option, see Time Saving Tips later in this manual.
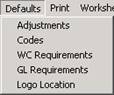 Defaults Click
here to view or enter the Audit Defaults.
The WC Requirements and GL Requirements should already be loaded into
these areas. To enter default Adjustments or Codes, select and in the screen that appears F-1 Add the Adjustment or Code and click F-3 Save before exiting.
Defaults Click
here to view or enter the Audit Defaults.
The WC Requirements and GL Requirements should already be loaded into
these areas. To enter default Adjustments or Codes, select and in the screen that appears F-1 Add the Adjustment or Code and click F-3 Save before exiting.
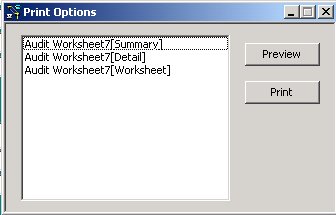
Print – Click on this menu heading to print or preview the audit worksheets. Click on the item to select it for printing or preview. You may preview only one at a time, but you may select more than one to print (unless printing to PDF file—then must print one at a time.).
Worksheets – Click on the Worksheet menu heading for worksheet creation and recalculation.
About – Click here for the Audit Module’s version number.
Exit – Click here to exit the Audit module screen.
Entering Your Audit Information
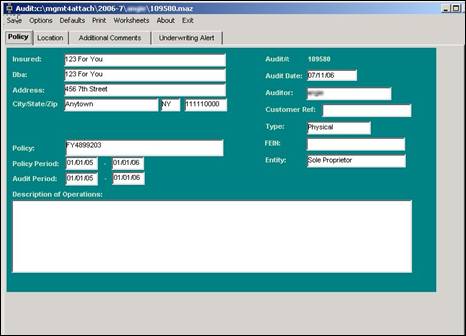
The Policy Tab
When you bring up the Audit module, the Policy Tab is the tab that will be showing.

The Policy Tab
 Although
the information previously entered when the Management Professional case was
created will automatically fill in on the Audit, there may be some information
missing. Policy information that is
available but missing from the screen should be entered, and the dates may be
adjusted as necessary. Typically an
auditor might enter the FEIN number,
select an Entity from the drop-down
list, and type in (or copy and paste from another source) a Description of Operations. After entering a description, you may
run a spell-check by first going up to Options
and clicking on Mode-Spell Check to
activate this feature. Once
activated, click on Save and the Spell Check screen will appear. Click on the Spell Check button to run the check. Close when complete. Once
the policy information is complete, click on the Location tab to continue completing the audit.
Although
the information previously entered when the Management Professional case was
created will automatically fill in on the Audit, there may be some information
missing. Policy information that is
available but missing from the screen should be entered, and the dates may be
adjusted as necessary. Typically an
auditor might enter the FEIN number,
select an Entity from the drop-down
list, and type in (or copy and paste from another source) a Description of Operations. After entering a description, you may
run a spell-check by first going up to Options
and clicking on Mode-Spell Check to
activate this feature. Once
activated, click on Save and the Spell Check screen will appear. Click on the Spell Check button to run the check. Close when complete. Once
the policy information is complete, click on the Location tab to continue completing the audit.
The Location Tab
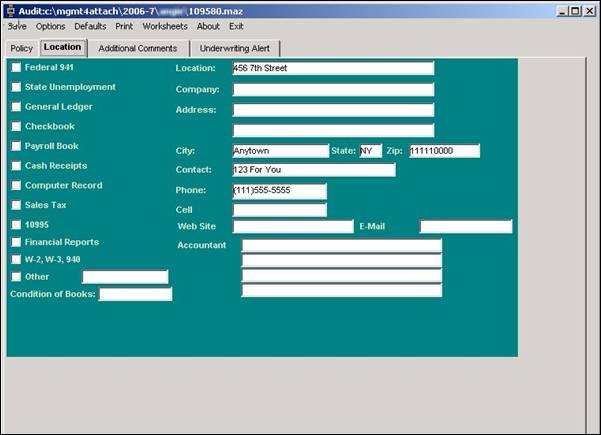
The Location Tab
Under the Location tab, checkmark the items (Federal 941, Checkbook, Financial Reports, etc.) that the auditor looked at. To save an extra step, checkmark both Workers Comp and General Liability items. If not in the list, checkmark Other and enter the item in the blank provided. Select the Condition of Books from the drop-down list (Good, Fair, Poor, N/A).
Any information that is available but missing from the Location tab should be typed into the appropriate area (Cell, Website, Email, etc.) If the auditor worked with an Accountant, fill in that information in the area provided.
It is important to frequently save your work by clicking on the Save option at the top of the screen.
Once the location information is complete, click on the Additional Comments tab to continue completing the audit.
The Additional Comments Tab
The Additional Comments Tab
If there are any additional comments about the Audit, enter them here. Again, you may save your work by clicking on Save at the top of the Audit screen.
The Underwriting Alert
Tab
The Underwriting Alert Tab
If there are any Underwriting Alerts necessary with the Audit, enter them here. If there is a variance of more than 20% this alert screen will pop up. Save your work by clicking on Save at the top of the Audit screen.
Worksheets
The next step in your audit is to create a worksheet.
Creating a Worksheet
Click on the Worksheet menu heading to bring up this menu:
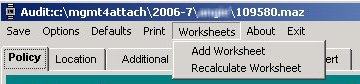
When you select Add Worksheet from the Worksheets menu, you will see a worksheet defaults screen. Use this screen to set up your worksheet according to the audit you are conducting.
The ID number is the number of the worksheet created for that audit. The Name will automatically show, but can be changed by clicking into the text area, deleting the current name and typing the new worksheet name.
Enter the Audit Period dates and click to select either Workers Comp or General Liability, and either Payroll or Sales.
The Default Type
is selected according to how the records were presented to the auditor. Click on the down arrow to bring up a
menu to select from. Choose Annual, Bi-Monthly, Bi-Weekly, Custom, Monthly, Quarterly, or Weekly. If Custom
is selected, right-click in the middle blank box to customize the column titles
and dates. You may also customize
by, for example, selecting Quarterly and
deleting a quarter, adding in “periods” with different dates, or
using
At the bottom of the Add Worksheet box you must checkmark the appropriate Workers Comp/General Liability codes for the appropriate worksheet. Selected codes will transfer to the Summary/Verification tab.

Click on the Add Worksheet button to add the worksheet, or the Cancel button to cancel the worksheet. When you’ve added the worksheet, a Worksheet tab will appear next to the other tabs on the audit. Click on the Worksheet tab to continue the Audit.
Note: if you start a worksheet using the wrong type, delete the worksheet by right-clicking on the worksheet’s tab and selecting “Delete Worksheet”. If you accidentally delete a worksheet, don’t save the changes and exit the audit then re-enter.
The Worksheet Tab
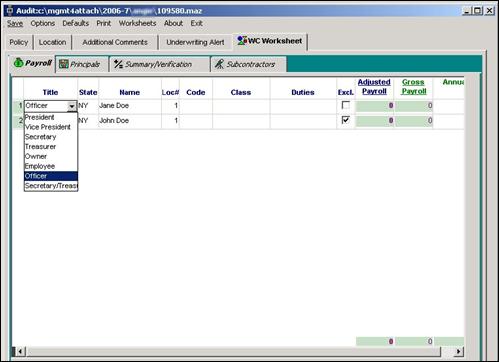
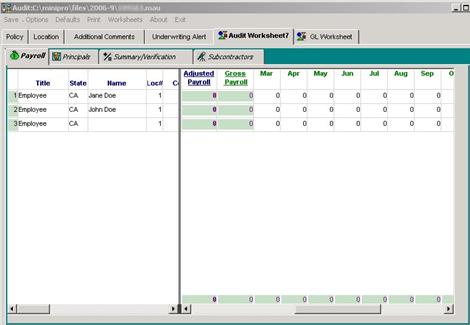
When you click on the Worksheet Tab in the Audit Module, a screen with several tabs will appear. The first is the Payroll Tab (or Sales Tab, if you selected Sales when the Worksheet was added). In
the example above, the worksheet was created as a Worker’s Comp, Payroll
worksheet.
The Payroll Tab
Here you will enter the names of all of the workers for the payroll audited. To enter a record in the Payroll Tab, right-click and select Add Record. You may add additional records by clicking into a blank record and hitting the down arrow on your keyboard. The records are numbered on the left side. Select the appropriate Title and enter the State and worker’s name. If more than one location exists, select the Loc# (Hint: If you double-click on the Loc# entry for that record a box will come up to allow you to enter a description for that location). Select the worker’s Code from the drop-down list and Class should appear. Enter the Duties, if applicable. If excluded from audit, checkmark the Excl. box. Input the wage amounts for each column and the totals will show at the bottom of the screen.
If you double-click in the Adjust Payroll entry for that record, a list of the tabs to the right will appear allowing you to enter all information right there. This is especially useful for monthly payroll as you may enter all of the months in the Adjust Payroll box rather than tabbing over to each column. Just enter the information and right-click, selecting Update Record. This will fill in the appropriate columns. Or, you may tab through the columns and enter the appropriate information. When completed, Save your work.
The Sales Tab
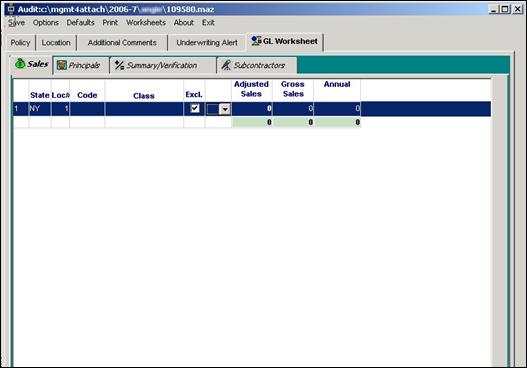
The Sales Tab
In this example, the worksheet was added as a General Liability, Sales worksheet. Here you will enter the sales information for the audit. To enter a record in the Sales Tab, right-click and select Add Record. The records are numbered on the left side.
Enter the State if not correctly shown. If more than one location exists, select the Loc# (Hint: If you double-click on the Loc# entry for that record a box will come up to allow you to enter a description for that location). Enter the sales Code and Class. If excluded from audit, checkmark the Excl. box. You may select Bal (balance) or Total from the drop-down box in the next column.
If you double-click in the Adjusted Sales entry for that record, a list of the tabs to the right will appear allowing you to enter all information right there. This is especially useful for monthly sales as you may enter all of the months in the Adjusted Sales box rather than tabbing over to each column. Just enter the information and it will fill in the appropriate columns. Or, you may tab through the columns and enter the appropriate information. When completed, Save your work.
Time-Saving Tips for the Payroll / Sales and Subcontractor Tabs
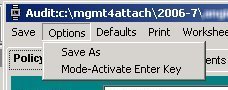
Mode-Activate Enter Key – Select this option to ease entering figures in the Worksheet’s Payroll, Sales and Subcontractor tabs. When this option is activated the Enter key acts as a tab key to more easily move from area to area.

Manipulating Records
· Menu: If you right-click somewhere in the Payroll / Sales or Subcontractors tabs a menu appears with several options to help manipulate the worksheet.
· Rows: Select a Row quickly by clicking on the record number on the left side of the tab’s screen. Once selected, you may easily delete the row by right-clicking and choosing Delete Record. Or you may move the entire row up or down in the list by selecting it and hitting the Page Up or Page Down keys on your keyboard. Click again to de-select.
· Copy Records across or down by clicking on an item, right-clicking and choosing those options. Especially useful when entering codes or other duplicated entries.
·
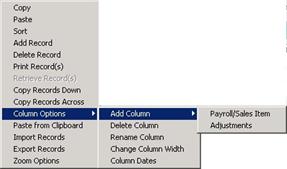 Columns: Right-click on a column
heading to change the column name,
or select the entire column by
clicking on the top. You can then move the column next to another while
working by clicking the top and dragging it. Note:
the next time the worksheet is opened the column will have its original
placement. Change column width by selecting that option on the menu (it will
ask if you want to change ALL), or Rename
Column. To delete
a column, figures must be “0”. You may enter dates or even split dates
for a column by right-clicking on the column name to bring up the menu and
selecting Column Dates. When you Add Column you may
select Payroll/Sales Item or Adjustments. In the box that appears, either name the
new Payroll/Sales Item column or
select the Adjustment. (You may add
default Adjustments by clicking on
the menu heading Defaults and
selecting Adjustments. Add a default
adjustment with F-1 Add, type in the
Adjustment Type and Multiplier. E.g. if the Adjustment type is Premium
Overtime, you might type POT and use 1.5 as the multiplier. Click F-3 Save and exit.)
Columns: Right-click on a column
heading to change the column name,
or select the entire column by
clicking on the top. You can then move the column next to another while
working by clicking the top and dragging it. Note:
the next time the worksheet is opened the column will have its original
placement. Change column width by selecting that option on the menu (it will
ask if you want to change ALL), or Rename
Column. To delete
a column, figures must be “0”. You may enter dates or even split dates
for a column by right-clicking on the column name to bring up the menu and
selecting Column Dates. When you Add Column you may
select Payroll/Sales Item or Adjustments. In the box that appears, either name the
new Payroll/Sales Item column or
select the Adjustment. (You may add
default Adjustments by clicking on
the menu heading Defaults and
selecting Adjustments. Add a default
adjustment with F-1 Add, type in the
Adjustment Type and Multiplier. E.g. if the Adjustment type is Premium
Overtime, you might type POT and use 1.5 as the multiplier. Click F-3 Save and exit.)
· Zoom: Use the Zoom Options to resize the screen. This may be helpful in order to print all records on one page.
Importing Lists from Other Programs
If you have a list in another program, perhaps Excel or Word, you may copy the list and then paste it into the Payroll / Sales or Subcontractor tabs. Highlight and copy the existing list, click into the top cell on the Payroll / Sales or Subcontractor tab, right-click and select Paste from Clipboard.
Duplicating the Worksheet
To save time, you may duplicate a
worksheet. This may be useful if you have a WC worksheet and you would like to
create a GL worksheet as well. Right-click on the Worksheet
Tab and select Duplicate Worksheet. When the Add Worksheet screen appears,
change the type and any other information and click on the Duplicate Worksheet button.
Once duplicated, you may adjust the information. Note: You may duplicate a WC to a GL Worksheet, but
not Payroll to Sales—you must create a new worksheet.
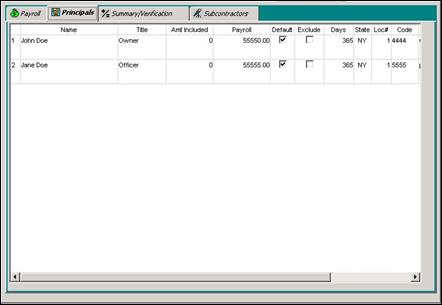
The Principals Tab
If any of the people listed on the Payroll Tab had a Principal title (such as President, Officer, Owner), then they will show up in the Principals Tab. If the worksheet is for Sales instead of Payroll, you may add the Principals by right-clicking and choosing F-1 Add.
Enter any missing information into the Name, Title, Amt. Included and Payroll record
areas. In some states there is a
minimum and maximum each officer can pay in Worker’s Comp. These should be listed in the WC Defaults found in the Defaults menu at the top of the Audit Module. Leave the Defaults checkbox checked if this applies to this
principal—if the default min/max does not apply, uncheck the box. If the worksheet is for General
Liability instead of Worker’s Comp, the defaults will be set up in the GL Defaults found in the Defaults menu. Note: if Defaults is checked
and there are none listed in WC or GL Defaults, you will not be able to
enter Amt. Included or Payroll.
Checkmark the Exclude box if the principal is excluded from the audit. % is the percent of the company owned by that principal. The number of days in the audit period is listed under Days. Enter the State, Loc#, and Code if not already shown. Enter the Class if not already shown. Under Class will be a button marked Duties--click to view or enter the duties of that Principal. The program will prompt to Save before closing, but it’s a good idea to save often.
Summary / Verification Tab

The Summary/Verification Tab
The Summary/Verification Tab in the Audit Module’s Worksheet shows a summary of the Worker’s Comp or General Liability. You may add a record by right-clicking and selecting Add Record. Shown are the Loc#, State, Code, Descr, Actual, Est, Exposure, % changed, Incl. Subs checkbox, and Location. To reflect any changes are made in the summary area, hit the Recalc button to recalculate the summary. Note: You may hit the Recalc button before you start so you know the information is current, and Recalc after adjusting any figures.
Then build the verification by entering the information from
the verification records provided to you at time of audit. For example, if the records are 941’s, you might enter each
quarter’s 941 filing by right-clicking and selecting Add Record and entering the information. If principals are excluded, the
verification table will Adjust Principals as well.
Recalc again. Note:
to save time, Add 2 or 3 Records and then enter your information.
The right lower area of the Summary/Verification Tab shows the Total from the upper area, the Verification amount, and the Difference, if any. The difference should always be Zero (0). If the difference is +20% or -20% a prompt for an Underwriting Alert will appear. Also shown are the Summary amount, the Subcontractors and Uninsured Subcontractors. Be sure to Save your work.
The Subcontractors Tab
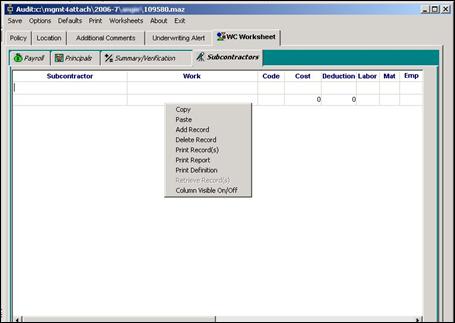
The Subcontractors Tab
If subcontractors are covered in the audit, enter that information in the Subcontractors Tab. Right-click to Add Record and enter the Subcontractor, Work, Code, Class, Cost, Deduction, and Difference. Select Yes or No for Labor, Materials, Employees, and Insured. If Yes is selected in Insured then enter the information for Limits, Insurance, Policy and Dates. Be sure to Save your work.
Recovering and Restoring Audits
Recovering an Audit
 If
your audit disappears from a case’s attachments/forms tab, you may find
it and reattach it by clicking on the Add File button. In the “Look In” area at the
top of the Location of File window, go to C:\minipro\files and you will see
folders arranged by month. Open the
folder that represents the missing audit’s month, find the missing audit
(a .maz file), highlight it and click the Open button
to reattach it to the case.
If
your audit disappears from a case’s attachments/forms tab, you may find
it and reattach it by clicking on the Add File button. In the “Look In” area at the
top of the Location of File window, go to C:\minipro\files and you will see
folders arranged by month. Open the
folder that represents the missing audit’s month, find the missing audit
(a .maz file), highlight it and click the Open button
to reattach it to the case.
Restoring an Audit
 If
your audit is still attached, but when you open it your worksheets or other information
is missing, you may still be able to restore the information. Open the audit and at the top click on
Options > Restore Backup, then select one of the
backup files that appears in the Backup window. Click the Restore button. It could take a little time to bring in
the info (You’ll see on the top banner of the audit “Please
wait…loading …Worksheet”). Once the audit name reappears on the
banner it is done. If your
information did not restore by selecting the first .mau
file on the list, you may try others that exist there as well. Once your information in restored and
the top banner of the audit shows the audit name you may Save your changes
If
your audit is still attached, but when you open it your worksheets or other information
is missing, you may still be able to restore the information. Open the audit and at the top click on
Options > Restore Backup, then select one of the
backup files that appears in the Backup window. Click the Restore button. It could take a little time to bring in
the info (You’ll see on the top banner of the audit “Please
wait…loading …Worksheet”). Once the audit name reappears on the
banner it is done. If your
information did not restore by selecting the first .mau
file on the list, you may try others that exist there as well. Once your information in restored and
the top banner of the audit shows the audit name you may Save your changes![]() and exit the
audit. If you want to verify that
it has been restored, exit the case and then reopen it, go back to the
Attachments/Forms tab and double click on the audit file to open again. Your restored information should show
up.
and exit the
audit. If you want to verify that
it has been restored, exit the case and then reopen it, go back to the
Attachments/Forms tab and double click on the audit file to open again. Your restored information should show
up.
Sending Your Completed Audit In
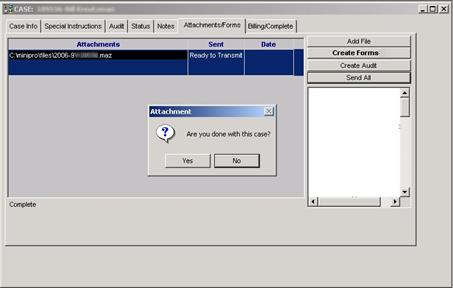
To send your completed audit in to the Company, make sure you Save and then Exit the audit module. This will take you back to the Attachment tab of the case or ticket.
Click on the Send All button so the Sent status of the attachment changes from New to Ready to Transmit. Close the case or ticket, saving your changes, and Connect to the Provider to send back to the Company.
For more information on sending in work through the MiniPro program, please consult the MiniPro Instruction Manual.